After buying my Yamaha Roadstar XV1600 motorcycle. I stumbled across a great group of guys at the RoadStarClinic.com. They enlightened me to some great modifications you can make to this bike to make it an even better ride than the already amazing cruiser is right from the factory.
The best one in my opinion was the modification referred to as the Roadwing. Which is basically taking the hydraulically adjustable preload shock from the rear of a Honda Goldwing, modifying it and installing it in place of the stock Roadwing shock. In essence giving you pre-load that is adjustable at the touch of a switch, or a manual RAP (more later on that). This is instead of the factory way of setting the preload with wrench's and adjusting nuts. Doing this every time you switch from 1-up to 2 up riding and vise-a-verse is ridiculous. With this mod you can switch the pre-load in seconds with the press of a button.
Before you are going to be able to install the shock you need to collect a few things and do a few modifications to the Goldwing shock to make it fit correctly in place of the stock shock.
 Stuff your going to need.
1. Goldwing shock with pump if you want the electric option. Without the pump for a RAP version.
2. Wiring harness (info on where to get a pre-made one later in the article.)
3. Gauge (to show preload level, More info later as well.)
4. 2 brass flanged bushings from McMaster-Carr part #6659K36.
5. 2 large washers for spacers outside the bushings.
6. 5w Hydraulic Fluid
7. Zip Ties.
What Shock do I need?
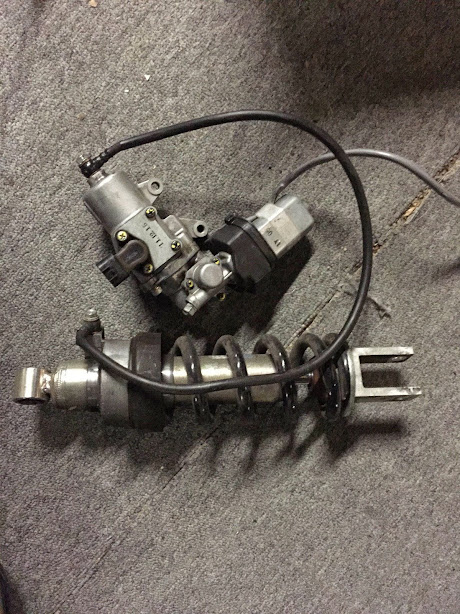
The Honda Goldwing came with the hydraulically adjustable preload rear shock in them across a lot of years. The design did not change much at all. Newer shocks have the blue labels on them with the earlier years black and red. If it looks like the shock above it will probably work. One recommendation is that it be from a larger bike to ensure the spring is heavy enough. A GL1500 to GL1800 would be a good sure bet size if you can find one.
How much is this going to cost me?
Believe it or not, not a fortune for the results you get. A few years ago Gold wing shocks were going to $300 plus. A lot of the time that was without the pump assembly. As of late prices have begun to get more reasonable, even dropping below $100 for the stock unit with the pump. I found mine for $50 plus shipping. The bushings run you $10 shipped to your door. Wiring harness is $50-60 if you don't make your own. So at the outside $150.00 and even less if your do everything yourself.
If you would like to get a roadwing that is ready to bolt in, either because you are not able to or just don't want to do the mods, then drop into roadstarclinic.com and ask for Smokes. he will send you a ready to bolt in shock that works right out of the box. Several other people there can help you with technical info as well. Your going to pay more, but your getting a ready to go plug and play shock.
Remove the Hydraulic Hose
 The first step is to remove the hydraulic hose, if there is one, that runs from the pump to the shock. This makes it a lot easier to maneuver the shock around during the upcoming modifications. Make sure you plug the hole in in the shock and taps up the end of the hose to prevent getting oil everywhere and keep from getting contamination in the hydraulic system. I found a simple yellow electrical wire nut works great on the shock. Turn it over and screw it into the hole.
Remove the Honda Bushing
The bolt hole that is in the Honda shock bushing is way to small for the Yamaha bolt to fit through, so we must remove it to make way for the correct bushing. This in itself can be a challenge. There are numerous ways on the web that I found to accomplish this for those of us that do not happen to have a handy dandy press laying around. If you do have a press, just find the right size round object such as a socket and press it right out. Then skip this section. If you do not however own a press, keep reading.
I have read stories of people using a Vise to press the bushing out of the shock. While a select few may get by with this, I can tell you from experience that this is a bad idea. My vice no longer has any threads inside the sucker. Cast Iron vices are not meant to apply that kind of pressure to anything. The internal threads will strip out leaving you with a wonderful door stop and a kewl story to tell it the garage when you buddies ask you why your holding the door open with a bench vice.
So I needed an alternative way to remove this bushing. Working in factory maintenance I had in the past used hydraulic rams to pull out bushings in machines that were to big to take to the press. This gave me the idea to pull the bushing out rather than push it through. I have used this same procedure to swap out A-arm bushings on many cars.
 Making a Receiver device.
To pull the bushing through you must have a place for it to go. So you must build a receiver for it to slide into. This is simply a Wood or plastic block with a 3/4" hole drilled into it. It needs to be thin enough to receive the bushing as well. Mine is about 1 1/4", which seems to be thick enough for the job. I chose the Plastic because it is durable and I had it laying around. a hardwood block will work just as well.
Modify a carriage bolt.
 Next we need to modify a carriage bolt to work as our puller. I chose a 1/2" x 3" carriage bolt as my tool of choice. The only problem with this is the head is too big to fit through the shock, so it will need to be ground down. Grind off the outer edge of the head (shown in red in the picture) until it is just under 3/4" of an inch in diameter. This allows it to slide right though the shock, but still contact the entire outer sleeve of the bushing to pull it through. I could have tried using a 3/8" bolt but the head wasn't large enough to cover the entire outer sleeve, and I figured it could break under the pressure need to pull the bushing out.
Drill out the Honda Bushing
Next you will find the 1/2" carriage bolt does not fit through the center of the stock Honda bushing. This is easily remedied by drilling the center of the bushing out with a 1/2" drill bit. The busing drills very easily, so it should be a quick fix.
 Bolt the homemade puller onto the shock
The next and obvious step is to bolt the puller to the shock. put the bolt through the bushing, then put the block you made earlier on the other side. Taking care to align the 3/4" hole with the bushing. I used a couple of large washers stacked on the nut side to cover the 3/4" hole and add a little strength.
 From here you just apply the nut to the carriage bolt and again check your alignment and snug everything up to make sure everything pulls straight out. Using a larger wrench here is beneficial, since it take a bit of pressure to get the job done. An air impact would make this a breeze.
 Start cranking on the nut until the pull block pulls away from the shock and Wallah! you have removed the bushing from the shock in one piece. If this is pretty new bike you now have a replacement Honda Goldwing shock bushing and the tools to replace it with.
Install Yamaha Roadstar sized bushings.
In a few other places I found on the web that do this, I see where they show the width of the Honda shock bung is narrower by a small amount compared to the Yamaha shock. They remedied the problem by grinding out the center of two large washers and placing them behind the bushings. While this has appeared to work for several people I looked at it and did not like the idea of the bushing not being supported 100% by the shock bung. The bushings are made of a very soft materials, i.e. brass, that when supported properly is extremely strong, but if it is not it will crack and break very easily under impact. So I opted to narrow up my bushing so they fit in tight against the bung and are supported better. I will then be able to add the spacing washers on the outside and in a couple of locations to boot.
Fitting the Bushings
 First I measured the width of the shock bung with a digital caliper, and then measured inside lip of the bushings while I held them together. I determined how mush I needed to remove from each bushing to get the split in the center of the bung. I marked a line on each bushing and headed to the belt sander. I sanded the first on e down and tapped it in place using a wooden block to prevent damage to the bushing. I then sanded on the second one and double checked my measurements until I knew it would fit in flush with the outside and meet up nicely in the middle. You only get one shot at the second bushing so check and recheck.

 What you end up with is a nice flush mounted bushing set that should be stronger that the stock setup. I think the setup with out
the washers looks cleaner and should last the lifetime of the shock.
PART 2 Coming Soon
This will entail modifying the shock housing, and installation of the shock and pump.
Part 3 will come later with the installation of the controls and readouts.
Thanks for reading. Ride Safe and keep the rubber on the road. Roadstar that is.
The best one in my opinion was the modification referred to as the Roadwing. Which is basically taking the hydraulically adjustable preload shock from the rear of a Honda Goldwing, modifying it and installing it in place of the stock Roadwing shock. In essence giving you pre-load that is adjustable at the touch of a switch, or a manual RAP (more later on that). This is instead of the factory way of setting the preload with wrench's and adjusting nuts. Doing this every time you switch from 1-up to 2 up riding and vise-a-verse is ridiculous. With this mod you can switch the pre-load in seconds with the press of a button.
Before you are going to be able to install the shock you need to collect a few things and do a few modifications to the Goldwing shock to make it fit correctly in place of the stock shock.
1. Goldwing shock with pump if you want the electric option. Without the pump for a RAP version.
2. Wiring harness (info on where to get a pre-made one later in the article.)
3. Gauge (to show preload level, More info later as well.)
4. 2 brass flanged bushings from McMaster-Carr part #6659K36.
5. 2 large washers for spacers outside the bushings.
6. 5w Hydraulic Fluid
7. Zip Ties.
What Shock do I need?
The Honda Goldwing came with the hydraulically adjustable preload rear shock in them across a lot of years. The design did not change much at all. Newer shocks have the blue labels on them with the earlier years black and red. If it looks like the shock above it will probably work. One recommendation is that it be from a larger bike to ensure the spring is heavy enough. A GL1500 to GL1800 would be a good sure bet size if you can find one.
How much is this going to cost me?
Believe it or not, not a fortune for the results you get. A few years ago Gold wing shocks were going to $300 plus. A lot of the time that was without the pump assembly. As of late prices have begun to get more reasonable, even dropping below $100 for the stock unit with the pump. I found mine for $50 plus shipping. The bushings run you $10 shipped to your door. Wiring harness is $50-60 if you don't make your own. So at the outside $150.00 and even less if your do everything yourself.
If you would like to get a roadwing that is ready to bolt in, either because you are not able to or just don't want to do the mods, then drop into roadstarclinic.com and ask for Smokes. he will send you a ready to bolt in shock that works right out of the box. Several other people there can help you with technical info as well. Your going to pay more, but your getting a ready to go plug and play shock.
Remove the Hydraulic Hose
The first step is to remove the hydraulic hose, if there is one, that runs from the pump to the shock. This makes it a lot easier to maneuver the shock around during the upcoming modifications. Make sure you plug the hole in in the shock and taps up the end of the hose to prevent getting oil everywhere and keep from getting contamination in the hydraulic system. I found a simple yellow electrical wire nut works great on the shock. Turn it over and screw it into the hole. Remove the Honda Bushing
The bolt hole that is in the Honda shock bushing is way to small for the Yamaha bolt to fit through, so we must remove it to make way for the correct bushing. This in itself can be a challenge. There are numerous ways on the web that I found to accomplish this for those of us that do not happen to have a handy dandy press laying around. If you do have a press, just find the right size round object such as a socket and press it right out. Then skip this section. If you do not however own a press, keep reading.
I have read stories of people using a Vise to press the bushing out of the shock. While a select few may get by with this, I can tell you from experience that this is a bad idea. My vice no longer has any threads inside the sucker. Cast Iron vices are not meant to apply that kind of pressure to anything. The internal threads will strip out leaving you with a wonderful door stop and a kewl story to tell it the garage when you buddies ask you why your holding the door open with a bench vice.
So I needed an alternative way to remove this bushing. Working in factory maintenance I had in the past used hydraulic rams to pull out bushings in machines that were to big to take to the press. This gave me the idea to pull the bushing out rather than push it through. I have used this same procedure to swap out A-arm bushings on many cars.
Making a Receiver device.To pull the bushing through you must have a place for it to go. So you must build a receiver for it to slide into. This is simply a Wood or plastic block with a 3/4" hole drilled into it. It needs to be thin enough to receive the bushing as well. Mine is about 1 1/4", which seems to be thick enough for the job. I chose the Plastic because it is durable and I had it laying around. a hardwood block will work just as well.
Modify a carriage bolt.
Next we need to modify a carriage bolt to work as our puller. I chose a 1/2" x 3" carriage bolt as my tool of choice. The only problem with this is the head is too big to fit through the shock, so it will need to be ground down. Grind off the outer edge of the head (shown in red in the picture) until it is just under 3/4" of an inch in diameter. This allows it to slide right though the shock, but still contact the entire outer sleeve of the bushing to pull it through. I could have tried using a 3/8" bolt but the head wasn't large enough to cover the entire outer sleeve, and I figured it could break under the pressure need to pull the bushing out. Drill out the Honda Bushing
Next you will find the 1/2" carriage bolt does not fit through the center of the stock Honda bushing. This is easily remedied by drilling the center of the bushing out with a 1/2" drill bit. The busing drills very easily, so it should be a quick fix.
Bolt the homemade puller onto the shockThe next and obvious step is to bolt the puller to the shock. put the bolt through the bushing, then put the block you made earlier on the other side. Taking care to align the 3/4" hole with the bushing. I used a couple of large washers stacked on the nut side to cover the 3/4" hole and add a little strength.
From here you just apply the nut to the carriage bolt and again check your alignment and snug everything up to make sure everything pulls straight out. Using a larger wrench here is beneficial, since it take a bit of pressure to get the job done. An air impact would make this a breeze.Start cranking on the nut until the pull block pulls away from the shock and Wallah! you have removed the bushing from the shock in one piece. If this is pretty new bike you now have a replacement Honda Goldwing shock bushing and the tools to replace it with.
 |
| Using Washers for spacing on the inside. Pic courtesy of Tykes place. |
In a few other places I found on the web that do this, I see where they show the width of the Honda shock bung is narrower by a small amount compared to the Yamaha shock. They remedied the problem by grinding out the center of two large washers and placing them behind the bushings. While this has appeared to work for several people I looked at it and did not like the idea of the bushing not being supported 100% by the shock bung. The bushings are made of a very soft materials, i.e. brass, that when supported properly is extremely strong, but if it is not it will crack and break very easily under impact. So I opted to narrow up my bushing so they fit in tight against the bung and are supported better. I will then be able to add the spacing washers on the outside and in a couple of locations to boot.
Fitting the Bushings
What you end up with is a nice flush mounted bushing set that should be stronger that the stock setup. I think the setup with out the washers looks cleaner and should last the lifetime of the shock.
PART 2 Coming Soon
This will entail modifying the shock housing, and installation of the shock and pump.
Part 3 will come later with the installation of the controls and readouts.
Thanks for reading. Ride Safe and keep the rubber on the road. Roadstar that is.
Comments